Posts tagged: dinner
Brisket Bombs
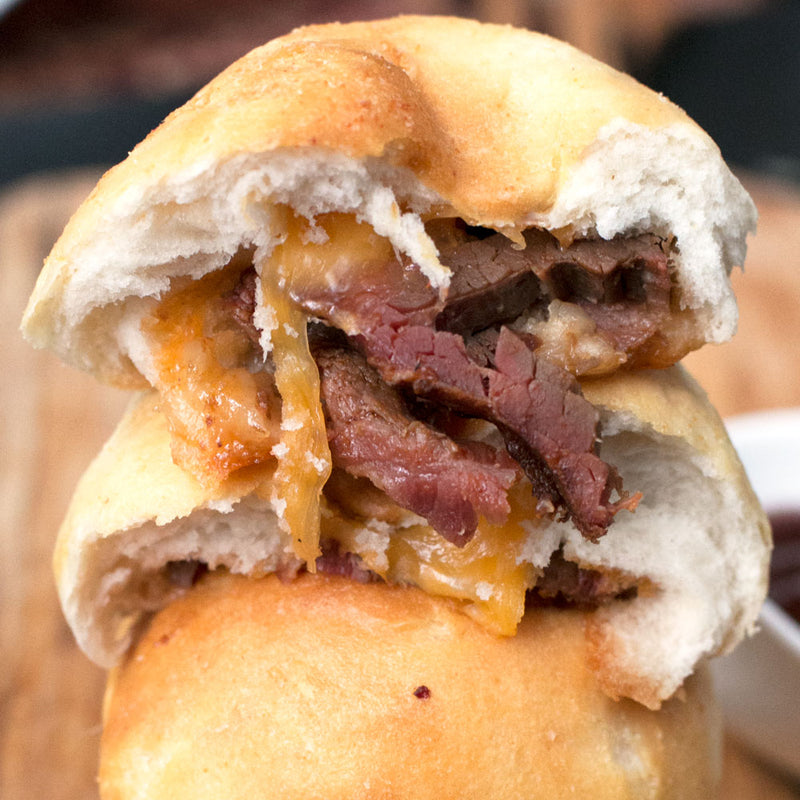

Ready to drop a bomb on that epic tailgating game this season? BOOM. These Brisket Bombs are here to do all the heavy lifting for ya.

Stuffed with Pig of the Month's INSANE brisket and all the cheddar cheese, these brisket bombs are the best football food you could ever ask for. It's got the carbs and the protein to load you up and balance out the booze, not to mention a ton of gooey cheese. Really, what is a football game without excessive amounts of cheese anyways?

It's a pretty boring event, that's what. You gotta get that cheese, meat and bread in while you tailgate for the big game this season! I mean, if you can't indulge before and during a football game, what the hell is the point of all the delicious, extravagant, decadent food out there in the world? I know that's a wee bit dramatic, but that's how freaking amazing these brisket bombs. They come together in about 15 minutes and they'll have everyone begging for more.
Brisket Bombs from Pig of the Month BBQ on Vimeo.
Don't believe me? I dare you to try these out for the next big game and prove me wrong...

INSTRUCTIONS: Preheat oven to 400 degrees. Line two baking sheets with a silicone baking mat or parchment paper. Separate biscuits. Flatten out each biscuit slightly and place 1 to 2 cubes of cheese in the center. Top with chopped biscuit and wrap the biscuit around the filling. Pinch the seams tightly and place seam-side down on the lined baking sheets. In a small bowl, combine melted butter, garlic powder and onion powder. Brush the tops of the biscuits with the seasoned butter. Bake 10 minutes. Remove from oven and brush the tops of the biscuits again with the seasoned butter. Serve with BBQ sauce.
Shop This Post
*Recipe, photos and video by Meghan Bassett

Bacon-Wrapped Caprese Stuffed Chicken
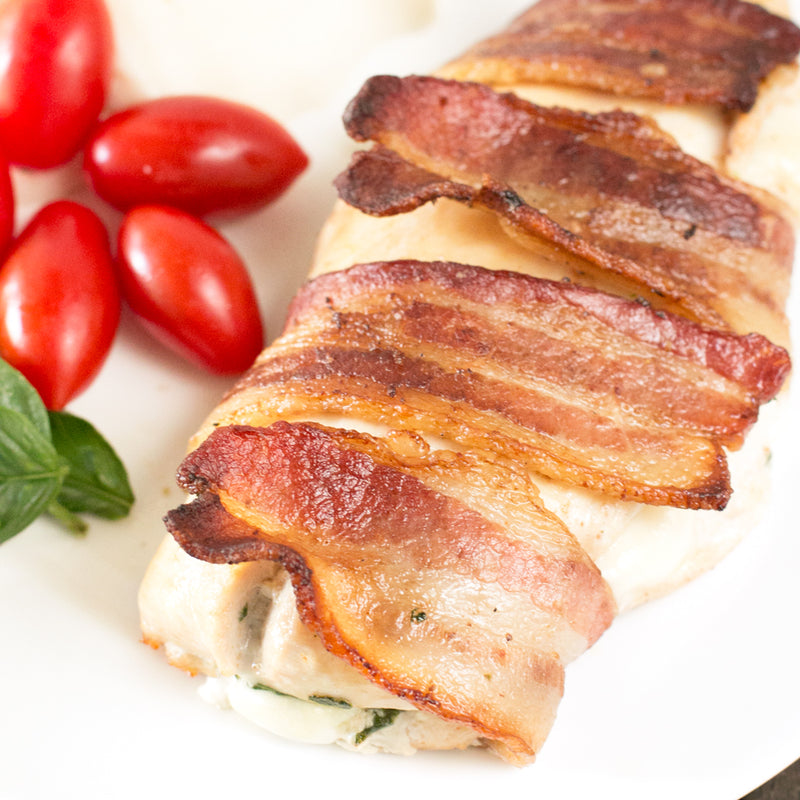

Weeknight meals can get really boring, am I right? I mean, there's only so many times you can cook a plain ol' chicken breast, match it up with some veggies and not get bored to tears. Sometimes you need to shake things up during the week, but you don't have time to master an insane recipe. Enter Bacon-Wrapped Caprese Stuffed Chicken.

These chicken breasts are going to seriously wow your family and I bet you already have most of these ingredients in your home (or even growing in your backyard for you herb and veggie growers out there!). All you have to do is stuff your chicken breasts with those classic caprese salad ingredients, wrap them in bacon and boom. Dinner is done in less than 30 minutes and your satisfying everyone at the table. I LOVE caprese salads - the mozzarella, the tomato, the basil - it all screams freshness and summer to me with every bite. Chicken lends itself so well to this combo so it only makes sense to stuff everything INSIDE the chicken breast. That combined with the bacon-wrapped exterior leaves you with one of the moistest pieces of chicken you'll ever dig into.

This will become a family fav in no time!
Bacon Wrapped Caprese Stuffed Chicken from Pig of the Month BBQ on Vimeo.


INSTRUCTIONS: Preheat oven to 400 degrees. Split each chicken breast in half. Stuff with 2 half slices of mozzarella, one half slice of tomato, and a generous sprinkle of chopped basil. Pinch the edges of the chicken breast closed.

Wrap each chicken breast with two slices of bacon, making sure the edges of the bacon overlap all on the same side of the breast. Heat olive oil in a large oven safe skillet over medium-high heat. Sear the chicken breasts for 2 to 3 minutes on each side, making sure to rotate to get it seared on all four sides. Place skillet in the oven and bake for 10 minutes, or until cooked through. Serve immediately.
Shop This Post
Pig of the Month Applewood Smoked Maple Bacon
*Recipe, photos and video by Meghan Bassett

Pulled Pork Mac n Cheese Grilled Cheese Sandwiches (in a waffle iron!)
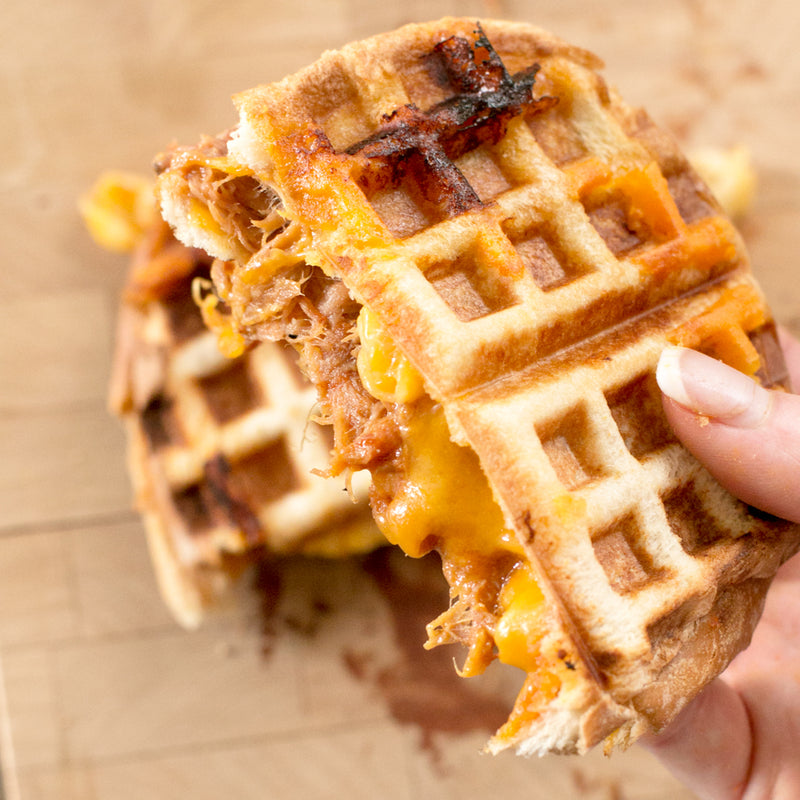

Hey food porn fans... I've got something extra special for you today... It's hot and crispy straight out of the waffle iron, stuffed with saucy pulled pork and so cheesy your head might explode. It's basically a giant mess of a sandwich, carefully contained in a pocket of waffle ironed bread.

This is seriously going to become your new favorite way to make grilled cheese sandwiches, period. The waffle iron crisps up the bread in a way that cooking it over the stove just doesn't do. It's like your own personal panini press, with more than one function in the kitchen! You just pinch down those edges and it forms a pocket of deliciousness.

When you open up this bad boy, all that pork, mac n cheese and cheddar comes oozing out in the most luscious way. You might have to stop and just stare at it before shoveling it in your mouth in one giant bite. Might have to stop. But we know you definitely won't delay the goodness, right?

Get those cameras ready folks, this is food worthy of that 'foodporn' hashtag on Instagram.


INSTRUCTIONS Grease waffle iron with cooking spray and turn on.

To assemble the sandwich, begin with adding one slice of cheese to a slice of bread.

Top with half of the pulled pork, then half of the mac and cheese.

Finish with the other slice of bread. Repeat with the second sandwich. When the waffle iron is hot, cook one sandwich at a time. Place the sandwich in the center and press down firmly. You may have to hold the waffle iron down as it will not close completely.

When the cheese is melted, approximately 1 to 2 minutes, remove sandwich from the waffle iron. Repeat with the other sandwich. Serve immediately.
Shop This Post
Pig of the Month BBQ Pulled Pork
*Recipe & photos by Meghan Bassett

Spicy Dry Rub Ribs
Spicy Dry Rub Ribs are smoky and spicy, perfect for your next BBQ gathering! The ribs come out extra tender and juicy, hot off the grill and finger-lickin' good.

It's finally grilling season! Is anyone else as excited as I am about this? I've been busting out the grill almost every single night for dinner and I gotta tell you, that grilled charcoal flavor is what I've been missing since Labor Day. Chicken, vegetables, burgers, steaks, I've been grilling it ALL.

Recently though, I've been obsessed about perfecting dry rub ribs on the grill. I've baked them more times than I can count, but nothing gets that BBQ flavor packed into the ribs like a grill. These ribs are the best combination of spicy and smoky on the outside, with perfectly tender and juicy meat on the inside. Seriously, the meat practically melts in your mouth with every bite.

Your next BBQ NEEDS these ribs. Or even your next weeknight meal! Rub the ribs down and wrap 'em up before you head to work in the morning, then just throw 'em on the grill when you get home. You'll have grilled up ribs in under an hour that'll curb all those BBQ cravings you've been having lately.


INSTRUCTIONS: In a medium bowl, stir to combine salt, brown sugar, paprika, garlic powder, onion powder, chili powder, cumin, black pepper and cayenne pepper.

Rub down the racks of ribs with the dry rub evenly. Wrap the racks in plastic wrap and let rest in the refrigerator for at least 2 hours.

Heat up your grill to 350 to 400 degrees and rub the grill racks with olive oil. Remove the ribs from the plastic wrap and place directly on the grill. Cook for 40 minutes, turning occasionally, until crispy and cooked through.

Allow the racks to rest 10 minutes before cutting into them and serving.

Recipe & photos by Meghan Bassett
Grilled Chili Rubbed Flank Steak
Grilled Chili Rubbed Flank Steak is a super simple way to take your grilled steak to the next level of flavor. The wet rub infuses so much tastiness into the flank steak - you can't go wrong with this one!

Are you ready for Memorial Day?? I am tweaking my menu daily for the annual massive BBQ I host, and I was feeling a little stumped earlier this week. That is, until now. This grilled chili rubbed flank steak changed ev-er-y-thang for me once I made it. It's one of the simplest recipes I've ever created, but in terms of flavor, it's ridiculously complex. All of the flavors in the rub perfectly compliment the meat and that really good charred taste you get from the grill.

You can easily serve this bad boy as is or there are about a million other ideas you could try out. Throw it on a salad. Chop it up and add it to a grilled pizza. Serve it with tons of grilled veggies. You can even make some killer tacos or a Tex Mex inspired sandwich with this meat. The options are limitless and it'll take you less than 15 minutes of active cooking time to make it happen.

So obviously, you should be adding this recipe to your Memorial Day menu right NOW.


INSTRUCTIONS: In a small bowl, combine garlic, lime juice, chili powder, salt, cumin, paprika and cayenne.

Stir until all ingredients are incorporated.

Rub the paste all over the steak. Let rest in the refrigerator for 15 to 20 minutes.

Grill the steak on a hot grill or grill pan over medium-high heat until it reaches your desired doneness (approximately 6 to 8 minutes for medium). Remove from grill and rest for at least 10 minutes before slicing and serving.

Serve alone over rice, with salad or even in tacos! Give it an extra squeeze of lime for a touch of extra brightness too. Recipe & photos by Meghan Bassett
Meat Lovers Pizza Roll Ups
Meat Lovers Pizza Roll Ups are a meat lover's dream! Packed with three different Pig of the Month BBQ meats, you will be in BBQ pizza heaven with every bite.

I have a serious obsession with BBQ pizza as soon as the warmer weather comes around. Aside from grilling everything and anything in sight, I'm all about the easy appetizers or snacks that I can munch on (or turn into a whole meal) while I messing with whatever I have going on the grill. These meat lovers pizza roll ups are my favorite solution for something summer and BBQ-packed that doesn't require me whipping out the grill - or something that doesn't take up that valuable real estate, you know?

Whether you are making these as a snack or appetizer for a party, or turning these into a fun weeknight BBQ meal for the family, you won't find a more meaty recipe out there that's this easy.
All you have to do is roll out some dough, stuff it with meat, bake and top with cheese. Just don't forget the extra BBQ sauce to serve them up with!

Sling me a beer and lets cheers to those tasty, juicy meats!
[vimeo 166821716 w=640 h=360]Meat Lovers Pizza Roll Ups from Pig of the Month BBQ on Vimeo.
INSTRUCTIONS:
Preheat oven to 425 degrees. Grease a baking sheet and set aside. On a lightly floured surface, roll out the pizza dough into a large 9x13-inch rectangle. Brush the dough with 1/3 cup of BBQ sauce. Layer on the pulled pork, brisket and bacon. Roll the dough up tightly and slice in 3/4-inch thick rolls. Add rolls to prepared baking sheet. Bake for 15 minutes. Sprinkle the rolls with cheese and broil until the cheese is melted. Serve immediately with extra BBQ sauce for dipping. Shop This Post Pig of the Month BBQ Pulled Pork Pig of the Month BBQ Brisket Pig of the Month BBQ Applewood Smoked Maple Bacon Recipe, photos & video by Meghan BassettUltimate Loaded Irish Skillet Nachos

If you are planning on celebrating St. Patrick's Day in any way this year, do it with these Ultimate Loaded Irish Skillet Nachos made with Pig of the Month BBQ Corned Beef. Forget the corned beef and cabbage (no one really likes cabbage as a side, do they?), these nachos are the best way to honor the land of the leprechauns! Regardless of when St. Patrick's Day falls during the week, you'll always find me celebrating with some corned beef and Guinness. Perhaps it's an homage to my Irish heritage, or perhaps it's just that I'll take any excuse to celebrate life with beer and some seriously delicious meat.

No matter why or how you celebrate this year, you owe it to yourself to include these Ultimate Loaded Irish Skillet Nachos. They are loaded up with thick-cut potato slices, a heaping helping of corned beef, cheese, avocado, sour cream and pickled jalapeños. It's the tastiest St. Patrick's Day recipe you'll come across, just trust us on this one.

And while you're digging in, remember to read what to eat before and after drinking so you can save yourself from a hangover tomorrow (bonus: this recipe covers those for you... Just saying - miracle recipe).


INSTRUCTIONS: Preheat oven to 400 degrees. Grease a baking sheet with cooking spray and set aside. In a large bowl, toss the sliced potatoes with olive oil, salt and pepper to coat. Place the potato slices on the greased baking sheet in one even layer. Bake for 15 minutes, flip the slices over and bake for another 15 minutes.

To assemble the nachos, add the potato slices to the bottom of a large cast iron skillet or other ovenproof skillet. Add the corned beef on top, followed by the pepper jack cheese and cheddar cheese. Place under the broiler set to high for 1 to 2 minutes, or until the cheese has melted.

Top with mashed avocado, pickled jalapeños, cherry tomatoes, cilantro, green onion and sour cream. Serve immediately.

Recipe & Photos by Meghan Bassett
« Previous 1 2
